


Photo by Lautaro Andreani on Unsplash
Replacing React Hooks With React Redux State Management Library Part 1
Lets Reformat My Currency App!


Using JavaScript to build complex web applications can get tiring when repetitive steps are involved, in such cases reusable logic is wasted, for instance, if I wanted to add a feature or state to an application globally.
Thankfully, developers smarter than us have created libraries to abstract away repetitive tasks. In this blog post, I'll be discussing one of these libraries: React, the most popular JavaScript library used today.
Let's delve into React with a brief introduction, brief because I can't cover all that React gives us developers access to.
Let's learn a bit about React before going into refactoring my application.
What Is React?

React is a JavaScript library (or package of tools you can use without strict guidelines) created by FaceBook that enables us to create User Interfaces or U.I's on the client side using JavaScript functions or classes.
For a more in-depth explanation, you can refer to the React Docs
So, using JavaScript functions like:
import React from "react";

function Header() {
return (
    <div>
        <p>Yup, This looks like HTML doesn't it?</p>
    </div>
)
}

export default Header;
Or classes like:
import React from "react";

class Header extends React.Component {
render() {
    return (
        <div>
            <p>Yup, a method on a class returning what looks like HTML.</p>
        </div>
   )
}

export default Header;
We can render HTML to the user:
Yes, writing HTML(to be exact JSX) returns no errors. That HTML-looking syntax returned from the function and class is known as JSX(JavaScript Syntax Extension), an XML-like syntax that React translates into HTML behind the scenes. It is understood by React as:
React.createElement("div", null, React.createElement("p", null, "Yup, a method on a class returning what looks like HTML."))
This should look very familiar to the regular JavaScript we use to manipulate the DOM using methods like document.createElment("div") .
React renders the code from top to bottom and only returns a single thing (this is why we compose JSX with the starting and ending elements the same).
All React components(composition of React elements) go through 3 stages or Lifecycles:
The Mounting Phase
The Updating Phase
The Unmounting Phase
The phases can be explicitly defined through React class methods:
import React from "react"

import React from "react"

class App extends React.Component {
  constructor(props) {
    super(props);
    this.state = {
      num: 0 // Technically no need for tis
    }
    console.log("loaded??")
  }

  componentWillMount() {
    console.log("will mount")
  }

  componentDidMount() {
    console.log("did mount")
  }

  componentWillReceiveProps(nextProps) {
    console.log("will receive props")
  }

  shouldComponentUpdate(nextProps, nextState) {
    console.log("should component update")
    // Return true or false based on your condition to control whether the component should update.
    return true;
  }

  componentWillUpdate(nextProps, nextState) {
    console.log("component will update")
  }

  componentDidUpdate(prevProps, prevState) {
    console.log("component did update")
  }

  componentWillUnmount() {
    console.log("component will unmount")
  }

  render() {
    console.log("rendered");
    return <h1>Rendered</h1>
  }
}

export default App;
These are known as life-cycle stages, and they will output to the console in the following order:
/*
loaded??
will mount
rendered
did mount
*/
The React docs are an excellent place to start digging deep into them:
One thing that's important to note is the fact that our React code doesn't manipulate the DOM(Document Object Model), instead, it manipulates React's virtual representation of the DOM which the React engine then compares to the actual DOM and updates the parts that changed, which is why the DOM in React doesn't refresh the page when changes happen.
You'll notice several things from both our classes and functions that return JSX earlier. We're importing the React library to use, which implies we need a package manager and/or a build system to write React code.
Typically you'd need:
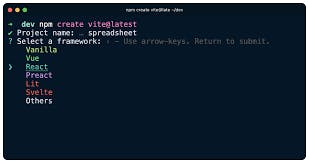
After all of that is installed, in your terminal you can then run the command:
npm create vite@latest
NPM will bring up several projects Vite will bundle to you, pick React.
NOTE: Like most libraries, React has a CDN(Content Delivery Network) you can use to load it up and test with regular HTML. The below link provides relevant info on that point:
Now that we've created the environment to run our React code, it's time to learn more about the things React provides that make it easier to create web applications.
React Hooks
Hooks are special functions native to React that are called at the top of our React Functional Components, they help to instantiate a state variable(I'll talk on state soon) along with a way to control the lifecycle of that state variable that's normally available to React Classes but we need Hooks to access them in React Function Components.
So let's break all that jargon down, a state as defined above is a piece of data that is tracked and available to be modified by a predefined set of functions or methods.
Let's list the most important ones in React:
useStateuseEffectuseReduceruseCallbackuseMemouseRefuseContext
Taking it from the top:
useState
This React hooks provides a way to create a state variable and then a function to be able to modify that state variable.
const [number, setNumber] = useState(0);
If you're familiar with destructuring, you'd notice we're destructuring the variables "number" and "setNumber" from "useState." This implies that useState is a function that returns an array where:
number: This is our state variable representing the current value.setNumber: This is a function we created to modify the state variable.useState(0): useState is carrying the default value the number state variable starts on.
Next, we have:
useEffect
This React hook provides a means to add asynchronous(tasks you wait for) logic to your code, it makes use of a callback, a return function and a dependency array to handle state mutations including for calling data from api's.
let foo = 'bar'

useEffect(() => {
if (foo = 'bar') {
foo = 'foo'
}
return () => {
    setTimeout(() => {
    foo = 'baz'
    }, 5000)
}, [foo])
To explain the code above, the useEffect hook will run when your app loads and then modify your foo variables value' to 'bar', the return function will run the setTimeout after 5 seconds to change the variable into "baz".
Note: The variable here is not a state variable from a React hook but a globally scoped variable.
Next, we have the:
useReducer
The useReducer hook is a React hook that allows you to combine multiple state variables to not pollute your code with many useState hooks in case you are keeping track of multiple state variables.
It uses 3 things to help manage the state.
A reducer function that is used to modify or create changes on your state variable.
The second is an action(a JavaScript Object) that triggers the reducer function to perform a certain change based on the string value of that action.
Third is the hook itself.
Lets take a look at the Reducer function:
const reducer = (state, action) => {
switch(action.type) {
    case "INCREMENT":
    return state + 1;
    case "DECREMENT":
    return state - 1;
    default:
    return state;
}
}
Looks complex, but as explained earlier the function above is used to "dispatch" state changes and to keep the state updated.
It accepts two parameters, the first is the state, the second is the action object.
Next is the useReducer Hook in our component:
const initialState = 0

function App() {
    const [state, dispatch] = useReducer(reducer, initialState)
    return ...
}
Now, just like the previous example with useState, the variables state and dispatch are destructured from the useReducer function, which itself holds the reducer and the initialState as the first and second parameters.
Let's combine all three:
import React, {useReducer} from "react"

const reducer = (state, action) => {
  switch(action.type) {
    case "INCREMENT":
      return state + 1;
    case "DECREMENT":
      return state - 1;
    default:
      return state;
  }
}

const initialState = 0

function App() {

  const [state, dispatch] = useReducer(reducer, initialState)

  return (
    <div>
      <h1>
        State is {state}.
      </h1>
      <p style={{display: "flex", gap: "10px"}}>
        <button onClick={() => dispatch({type: "INCREMENT"})}>Increment</button>
        <button onClick={() => dispatch({type: "DECREMENT"})}>Decrement</button>
      </p>
    </div>
  )
}

export default App;
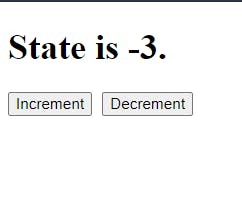
This produces the result below:
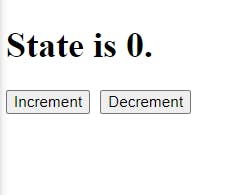
If you click on the Increment button, our initial state increments by one through the reducer.
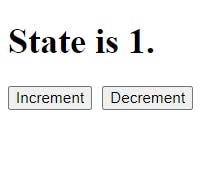
We can also decrement the number as many times as we want.
Now that we understand useReducer let's go into the next hook:
useCallback
The useCallback hook allows us to "memoize" or save a value to prevent needlessly re-rendering.
import {useCallback} from "react"

function App() {
  let num = 0
  const changeHandler = useCallback((e) => {
    num++
  console.log(`${num}`)
  }, [num])

  return <div onMouseMove={changeHandler} style={{minHeight: "100vh"}}></div>
}

export default App;
The code above is returning a div that I've passed a function to an onMouseMove event, this triggers the changeHandler function to run and then we use the useCallback to update our num value.
We can do a lot of things with useCallback which would increase the performance of our application by caching a value.
useMemo
The useMemo hook is another powerful tool in the React developer's toolbox. It allows us to optimize our application's performance by memoizing expensive calculations or functions. Essentially, it helps prevent unnecessary recalculations when our component re-renders.
Here's a simple example of how useMemo can be used:
import React, { useMemo } from "react";

function App() {
  const expensiveCalculation = useMemo(() => {
    // Perform some complex computation here
    return result;
  }, [dependencyArray]);

  return (
    <div>
      <p>Result of Expensive Calculation: {expensiveCalculation}</p>
    </div>
  );
}

export default App;
In this example, expensiveCalculation will only be recomputed when the values in the dependencyArray change. This can greatly improve performance in situations where these calculations are resource-intensive.
Next, we have:
useRef
The useRef hook is used to create mutable references to DOM elements or values that persist across renders. It's a versatile tool, commonly used for accessing and modifying DOM elements directly.
Here's an example demonstrating how useRef can be employed:
import React, { useRef, useEffect } from "react";

function App() {
  const inputRef = useRef(null);

  useEffect(() => {
    inputRef.current.focus();
  }, []);

  return (
    <div>
      <input ref={inputRef} type="text" />
    </div>
  );
}

export default App;
In this case, the inputRef is used to create a reference to the input element. We can then use inputRef.current to access and manipulate the input element directly.
Finally, we have:
useContext
The useContext hook is used for consuming values from React's context API. It allows functional components to access values provided by a parent component higher up the component tree.
Here's an example:
import React, { useContext } from "react";

const ThemeContext = React.createContext("light");

function App() {
  const theme = useContext(ThemeContext);

  return (
    <div>
      <p>Current Theme: {theme}</p>
    </div>
  );
}

export default App;
In this example, we're using useContext to access the current theme value provided by a parent component. This is particularly useful for sharing data, such as user authentication status or theme preferences, across different parts of your application without the need for explicit prop drilling.
Think of it like providing a means to send state that is scoped to one part of our application to be accessible by all parts that we want and that would be consumed by the entire application or just a select part we want to have that state.
Now you might have asked what is prop-drilling?
Prop-drilling
Prop-drilling is the situation where you are sending props from a parent React component to grandchildren components, as you can imagine this can be very tiring especially if you have 20 components that are higher up among your React components.
import React, { useState } from "react"

function ComponentOne(props) {
const [name, setName] = useState("I am David Bayode")
return <ComponentTwo name={name} setName={setName} />

function ComponentThree(props) {
const {name, setName} = props;
return <ComponentFour name={name} setName={setName} />
}

function ComponentFive(props) {
const {name, setName} = props;
return <ComponentFive name={name} setName={setName} />
}

function ComponentSix() {
const {name, setName} = props;
return <ComponentSeven name={name} setName={setName} />
}

function ComponentEight() {
const {name, setName} = props;
return <ComponentNine name={name} setName={setName} />
}

export default ComponentOne;
In our React Components above, we are sending the state variable called name which contains the string "I am David Bayode" over 5 children components as they are needed by ComponentNine , now imagine if we had 30 components to pass our prop through, that's prop-drilling.
Reacts useContext hook to prevent the unnecessary prop-drilling.
With these Hooks, Reacts Functional Components give us ways to safely manipulate the virtual DOM and render our changes.
There are more things to go through like mapping items in React Components using key prop, using Reacts lazy loading, Error Boundaries but you can find that out by reading the React Doc, next part we'll start on the Currency App.
Thank you for reading.